The iris flowers have different species and you can distinguish them based on the length of petals and sepals using Machine Learning.The different species of iris flowers that are used in this project are Setosa,Virginica and Versicolor.we will measure the length and width of sepal and petal.
Before diving into project,we have to download the Python Latest version(3.8.2),then download and install anaconda prompt.
Next step is to open anaconda prompt and open jupyter notebook

This will automatically opens the jupyter notebook through browser.
Next, you to make sure to download all the required libraries which we have to use in the Machine Learning project.Some libraries which we have used are pandas,sklearn,matplotlib.
To install these libraries open command prompt and type(one by one):
$pip install pandas
$pip install sklearn
$pip install matplotlib
Let’s begin,The code can be found on my github link.
Problem Statement
Create the model that can classify the different species of the Iris flower.
Problem Solving
- Prepare the data
- Evaluate Algorithms
- Improve Results
- Present Results
Overview on how to dive into the project
- Import Libraries
- Loading the dataset
- Summarizing the dataset
- Visualizing the dataset
- Evaluating some algorithms
- Making some predictions
1.Import Libraries
First of all,let’s import all modules,functions and objects that we have to use
# Load libraries
from pandas import read_csv
from pandas.plotting import scatter_matrix
from matplotlib import pyplot
from sklearn.model_selection import train_test_split
from sklearn.model_selection import cross_val_score
from sklearn.model_selection import StratifiedKFold
from sklearn.metrics import classification_report
from sklearn.metrics import confusion_matrix
from sklearn.metrics import accuracy_score
from sklearn.linear_model import LogisticRegression
from sklearn.tree import DecisionTreeClassifier
from sklearn.neighbors import KNeighborsClassifier
from sklearn.discriminant_analysis import LinearDiscriminantAnalysis
from sklearn.naive_bayes import GaussianNB
from sklearn.svm import SVC
Import all the above libraries on jupyter notebook.Everything should load without error.If there is an error,we need to work on your SciPy environment.
2.Loading the dataset
#Load dataset
url="https://raw.githubusercontent.com/jbrownlee/Datasets/master/iris.csv"
names = ['sepal-length', 'sepal-width', 'petal-length', 'petal-width', 'class']
dataset = read_csv(url, names=names)
Make sure the dataset should load without any error.
3.Summarizing the dataset
Now it's time to play with data.
We are going to take a look at data in few different ways :
- Dimensions of the dataset
- Peek at the data
- Statistical summary of all attributes
- Class distribution
Dimensions of dataset
# shape
print(dataset.shape)
This shows how many instances(rows) and how many attributes(columns) the data contains with the shape property.
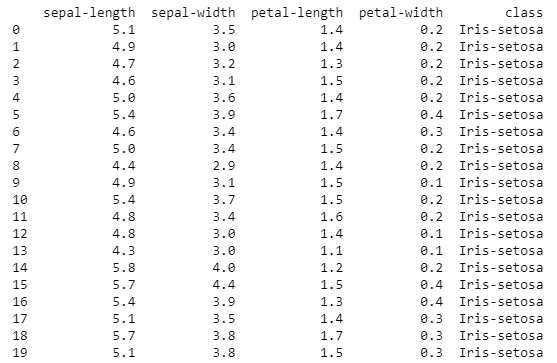
Peek at the data
# head
print(dataset.head(20))
By doing this we should see the first 20 instances of the data.
Statistical Summary
# descriptions
print(dataset.describe())
The describe() function will include the count,mean,the min and max values as well as some percentiles.

Class distribution
Now we will look at the number of instances that belong to each class and we can view this as a absolute count.
# class distribution
print(dataset.groupby('class').size())
4.Data Visualization
Now we need to extend the data with some visualizations.
We have two types of plots:
- Univariate plots to better understand each attribute.
- Multivariate plots to better understand the relationships between attributes.
- Univariate plots
Now we have to start plotting of each individual variable.Given that input variables are numeric,we can create box plots and whisker plots each
# box and whisker plots
dataset.plot(kind='box', subplots=True, layout=(2,2), sharex=False, sharey=False)
pyplot.show()
We can also create histogram of each input variable to get an idea of the distribution.
# histograms
dataset.hist()
pyplot.show()
2.Multivariate plots
# scatter plot matrix
scatter_matrix(dataset)
pyplot.show()
5.Evaluate Some Algorithms
Now we have to create some models of data and estimate their accuracy on unseen data.
we are going to create few steps such as:
- Create a validation dataset
- Test harness
- Build Models
- Select Best Model
- Create a validation dataset
We need to know the model we created is good or not?
Then,we have to use statistical methods to estimate the accuracy of the models that we create on unseen data by evaluating it on actual unseen data.
We will use this data to get a second and independent idea of how accurate the best model might actually be.
We will split the loaded dataset into two,80% of which we will use to train,evaluate and select among our models,and 20% that we will hold back as a validation dataset.
# Split-out validation dataset
array = dataset.values
X = array[:,0:4]
y = array[:,4]
X_train, X_validation, Y_train, Y_validation = train_test_split(X, y, test_size=0.20, random_state=1)
Now we have training data in the X_train and Y_train for preparing models and a X_validation and Y_validation sets that we can use later.
2.Test Harness
We will use stratified 10-fold cross validation to estimate model accuracy.
This will split our dataset into 10 parts, train on 9 and test on 1 and repeat for all combinations of train-test splits.
Stratified means that each fold or split of the dataset will aim to have the same distribution of example by class as exist in the whole training dataset.
We are using the metric of ‘accuracy‘ to evaluate models.
3.Build Models
We don’t know which algorithm would be good on this problem
Let’s test 6 different algorithms(mixture of linear and non-linear algorithms):
- Logistic regression
- Linear discriminant Analysis
- K-Nearest Neighbour
- Classification and Regression Trees
- Gaussian Naive Bayes
- Support Vector Machines
Build and evaluate our models:
#check algorithms
models = []
models.append(('LR', LogisticRegression(solver='liblinear', multi_class='ovr')))
models.append(('LDA', LinearDiscriminantAnalysis()))
models.append(('KNN', KNeighborsClassifier()))
models.append(('CART', DecisionTreeClassifier()))
models.append(('NB', GaussianNB()))
models.append(('SVM', SVC(gamma='auto')))
# evaluate each model in turn
results = []
names = []
for name, model in models:
	kfold = StratifiedKFold(n_splits=10, random_state=1, shuffle=True)
	cv_results = cross_val_score(model, X_train, Y_train, cv=kfold, scoring='accuracy')
	results.append(cv_results)
	names.append(name)
	print('%s: %f (%f)' % (name, cv_results.mean(), cv_results.std()))
4.Select Best Model
We now have 6 models and accuracy estimations for each. We need to compare the models to each other and select the most accurate.
# Compare Algorithms
pyplot.boxplot(results, labels=names)
pyplot.title('Algorithm Comparison')
pyplot.show()
We can see that the box and whisker plots are squashed at the top of the range, with many evaluations achieving 100% accuracy, and some pushing down into the high 80% accuracies.
6.Make Predictions
We must choose an algorithm to use to make predictions.
The results in the previous section suggest that the SVM was perhaps the most accurate model. We will use this model as our final model.
Now we want to get an idea of the accuracy of the model on our validation set.
It is valuable to keep a validation set just in case you made a slip during training, such as overfitting to the training set or a data leak. Both of these issues will result in an overly optimistic result.
Make Predictions
We can fit the model on the entire training dataset and make predictions on the validation dataset.
# Make predictions on validation dataset
model = SVC(gamma='auto')
model.fit(X_train, Y_train)
predictions = model.predict(X_validation)
Evaluate Predictions
We can evaluate the predictions by comparing them to the expected results in the validation set, then calculate classification accuracy, as well as a confusion matrix and a classification report.
# Evaluate predictions
print(accuracy_score(Y_validation, predictions))
print(confusion_matrix(Y_validation, predictions))
print(classification_report(Y_validation, predictions))
Finally, the classification report provides a breakdown of each class by precision, recall, f1-score and support showing excellent results.

We can see that the accuracy is 0.966 or about 96% on the hold out dataset.